Battery switch on travel trailer function is crucial for managing your RV’s power. Understanding how your battery switch works is key to preventing dead batteries and ensuring a smooth camping experience. This guide breaks down the different types of switches, their operation, troubleshooting tips, and safety precautions. We’ll cover everything from selecting the right switch for your needs to maintaining it for optimal performance.
Get ready to become a battery switch expert!
From single-pole to double-pole double-throw switches, we’ll explore the advantages and disadvantages of each type, providing a clear comparison to help you make informed decisions. We’ll also walk you through the step-by-step operation, troubleshooting common problems, and essential safety measures. By the end, you’ll be confident in handling your travel trailer’s battery system.
Types of Battery Switches in Travel Trailers

Choosing the right battery switch for your travel trailer is crucial for managing your power sources efficiently and safely. Different switches offer varying levels of control and protection, impacting both convenience and the lifespan of your batteries. Understanding the differences will help you make an informed decision based on your specific needs.
Single-Pole Battery Switches
Single-pole switches are the simplest type. They essentially act as an on/off switch for a single battery bank. This means you can disconnect the battery from the trailer’s electrical system completely. This is useful for preventing parasitic drain when the trailer is stored for extended periods. However, they offer limited control over multiple batteries or power sources.
Double-Pole Battery Switches
Double-pole switches provide more control than single-pole switches. They can disconnect both positive and negative terminals simultaneously, offering better safety and preventing accidental shorts. This increased safety is a significant advantage, especially when working on the electrical system. However, like single-pole switches, they typically only manage one battery bank at a time.
Double-Pole Double-Throw (DPDT) Battery Switches
DPDT switches offer the most versatility. They allow you to switch between two different battery banks (e.g., a house battery bank and a starting battery) or select which bank powers the trailer’s systems. This is particularly useful for trailers with multiple batteries, allowing you to prioritize one battery bank over another. For instance, you might use your deep-cycle house batteries for appliances and the starting battery for the vehicle.
The added complexity, however, does come at a higher cost.
Comparison of Battery Switch Types, Battery switch on travel trailer function
| Feature | Single-Pole | Double-Pole | Double-Pole Double-Throw (DPDT) |
|---|---|---|---|
| Number of Battery Banks Controlled | One | One | Two or more |
| Safety Features | Basic | Disconnects both positive and negative | Disconnects both positive and negative; allows switching between banks |
| Versatility | Low | Medium | High |
| Cost | Low | Medium | High |
| Suitability | Small trailers with one battery | Small to medium trailers with one battery, prioritizing safety | Larger trailers with multiple batteries, requiring switching between banks |
Battery Switch Operation and Functionality
Understanding your travel trailer’s battery switch is crucial for managing power effectively and preventing battery drain. This switch acts as a central control point, allowing you to select which battery (or batteries) provide power to your trailer’s systems. Proper operation ensures you’re using the right power source at the right time, maximizing your battery life and avoiding unexpected power outages.Operating a typical battery switch is straightforward, but understanding its different positions is key.
Most switches have clearly labeled positions for “Off,” “Battery 1” (usually the house battery), “Battery 2” (often the tow vehicle’s battery), and sometimes a “Both” position.
Battery Switch Operation Procedure
To operate the switch, simply turn the knob or lever to the desired position. A clear click or definite resistance will usually indicate that the switch has engaged properly. Always visually confirm the switch position after turning it. Before connecting to shore power, ensure the switch is in the correct position to avoid accidental cross-charging or short circuits.
When disconnecting from shore power, you may want to switch to your house battery to power your 12V systems. After disconnecting from shore power, check the switch position to ensure it’s in the correct position for your needs.
So, you’re planning a trip? Awesome! First things first: get travel insurance. Seriously, check out Aon travel insurance – they’ve got you covered. And while you’re at it, don’t forget your tunes! If you’re an audiophile, setting up your audiophile travel setup beforehand is key for enjoying those amazing vacation soundscapes. Proper planning makes for a smoother, more enjoyable trip, guaranteed!
Battery Switch Role in Power Management
The battery switch plays a vital role in managing power flow between your travel trailer’s house battery and your tow vehicle’s battery. In the “Off” position, all power is disconnected, preventing accidental drain on your batteries. Selecting “Battery 1” directs power from your trailer’s house battery to the trailer’s 12V systems. Selecting “Battery 2” allows you to power your trailer’s systems from your tow vehicle’s battery – useful for charging your house battery or running systems when the tow vehicle is connected.
The “Both” position (if available) connects both batteries, allowing you to use power from both simultaneously, often for charging one battery from the other or running high-power appliances. Improper use can lead to battery damage, so understanding the switch’s function is crucial.
Power Flow Through the Battery Switch
The following flowchart illustrates the power flow through a typical battery switch in different positions. Note that this is a simplified representation, and the specific implementation may vary depending on the switch and your trailer’s wiring.
+-----------------+     +-----------------+     +-----------------+
|    Battery 1    |---->|  Battery Switch  |---->| Trailer Systems |
+-----------------+     +-----------------+     +-----------------+
       ^                                          |
       |                                          |
       +-----------------------------------------+
                    |
                    V
+-----------------+     +-----------------+
|    Battery 2    |---->|  (Optional)     |
+-----------------+     +-----------------+

Switch Positions:

OFF: No power flows to the trailer systems.
Battery 1: Power flows from Battery 1 to the trailer systems.
Battery 2: Power flows from Battery 2 to the trailer systems.
Both: Power flows from both Battery 1 and Battery 2 to the trailer systems (often used for charging).
Battery Switch Maintenance and Upkeep: Battery Switch On Travel Trailer Function
Keeping your travel trailer’s battery switch in good working order is crucial for reliable power and preventing costly repairs down the road. Regular maintenance ensures the switch operates smoothly and efficiently, extending its lifespan and preventing potential electrical issues. Neglecting maintenance can lead to corrosion, poor connections, and even complete switch failure, leaving you stranded without power.
Regular inspection and cleaning are key to maintaining your battery switch. A simple visual check can reveal problems early, allowing for preventative action. Corrosion is a common enemy of electrical components, so proactive cleaning prevents this buildup from hindering performance.
Battery Switch Inspection Schedule
A consistent maintenance schedule will help you catch potential problems before they become major issues. Aim for a visual inspection at least every three months, or more frequently if you use your trailer in harsh environments (e.g., near saltwater or in areas with high humidity). A more thorough cleaning and lubrication should be performed at least once a year.
Consider more frequent maintenance if your trailer is exposed to particularly harsh conditions.
Cleaning and Lubricating the Battery Switch
Before starting any cleaning or lubrication, always disconnect the battery cables from the switch. Safety first! Use a wire brush or a specialized electrical contact cleaner to remove any corrosion or debris from the switch terminals and contact points. A small amount of dielectric grease, specifically designed for electrical connections, can then be applied to the terminals to protect against future corrosion and improve conductivity.
Avoid using petroleum-based lubricants, as these can attract dirt and damage the switch components. After cleaning and lubricating, reconnect the battery cables, ensuring a secure connection.
So, you’re planning a trip? Awesome! First things first: get yourself sorted with travel insurance. Check out Aon travel insurance for comprehensive coverage. Then, think about your in-flight entertainment. If you’re an audiophile, setting up your audiophile travel setup beforehand is key for a truly enjoyable journey.
Don’t forget noise-cancelling headphones – trust me, your ears will thank you!
Preventative Maintenance Recommendations
Several steps can help extend the life of your battery switch. Always ensure the switch is properly secured and protected from the elements, particularly moisture. A waterproof cover can be a worthwhile investment in harsh climates. Regularly check the battery connections for tightness and corrosion. Loose connections can lead to overheating and premature failure of the switch.
Also, avoid overloading the switch by exceeding its amperage rating. Using appropriately sized wiring and fuses is vital to protect the switch from excessive current.
Wiring Diagrams and Connections
Understanding the wiring configuration of your travel trailer’s battery switch is crucial for safe and reliable operation. Incorrect wiring can lead to electrical issues, damage to your components, or even fire hazards. This section will detail typical wiring setups and illustrate different scenarios.
This section details typical wiring configurations for battery switches in travel trailers. We’ll explore common scenarios and the purpose of each wire and its connection points. Remember to always consult your specific trailer’s wiring diagram and use appropriate safety precautions when working with electrical systems.
Typical Battery Switch Wiring
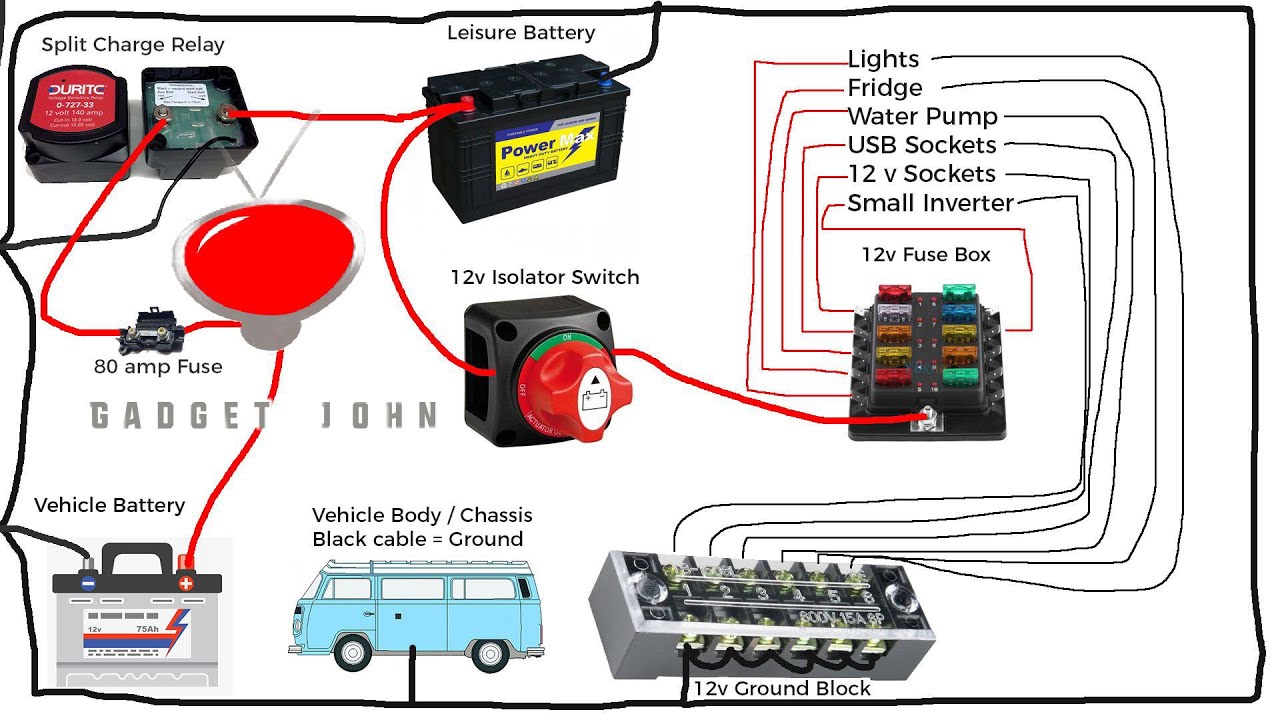
A basic setup involves two batteries (house and chassis), a battery switch, and the trailer’s electrical system. The house battery powers interior lights, appliances, and other 12V systems, while the chassis battery powers the trailer’s running lights and other essential functions. The battery switch allows you to isolate or combine these batteries.
Imagine a diagram: The positive (+) terminal of each battery connects to a corresponding input terminal on the battery switch. The output terminal of the battery switch then connects to the positive bus bar for the trailer’s electrical system. Negative (-) terminals of both batteries are typically connected directly to the trailer’s chassis ground, bypassing the switch for safety and simplicity.
This is a common configuration, ensuring a reliable ground path regardless of the switch’s position.
Wiring Scenario: Two Batteries, Single Switch, Combined Operation
This setup combines both batteries to power the trailer’s systems when the switch is in the “ON” position. In the “OFF” position, both batteries are disconnected from the trailer’s electrical system.
Imagine a diagram showing two batteries (labeled “House Battery” and “Chassis Battery”), each with a positive (+) and negative (-) terminal. A three-position switch (OFF, HOUSE, BOTH) is shown in the middle. Solid lines represent positive (+) wires, dashed lines represent negative (-) wires. The positive (+) terminals of both batteries connect to the switch inputs. The switch output connects to the positive (+) bus bar of the trailer’s electrical system.
The negative (-) terminals of both batteries are directly connected to the trailer’s chassis ground (indicated by a ground symbol).
In this scenario, the positive wires from both batteries are routed through the switch, allowing you to control the flow of power from both batteries simultaneously or isolate them completely.
Wiring Scenario: Two Batteries, Dual Switch System
A more sophisticated setup uses two separate switches—one for each battery. This offers more granular control, allowing you to use either battery individually or both together.
Imagine a diagram with two separate switches. Each switch controls a single battery, with its positive (+) terminal going to the switch input, and the switch output connecting to the positive (+) bus bar via a fuse. The negative (-) terminals are still directly connected to the trailer’s chassis ground.
This configuration provides greater flexibility and allows for independent management of each battery’s charge and discharge. A blown fuse in one circuit will not affect the other.
Wire Identification and Color Codes
While color codes can vary, a common practice uses red for positive (+) wires and black for negative (-) wires. Always verify wire functions using a multimeter before making any connections. The positive wires from the batteries connect to the battery switch’s input terminals, and the output terminal connects to the positive bus bar of the trailer’s electrical system.
Negative wires connect directly to the chassis ground.
Mastering your travel trailer’s battery switch is a significant step towards confident RV ownership. By understanding the different types of switches, their operation, and the importance of safety, you’ll be well-equipped to prevent power problems and extend the life of your battery system. Remember regular inspection and maintenance are your best allies in ensuring a reliable power supply for all your adventures.
Happy travels!
Popular Questions
What happens if I leave my battery switch in the “off” position?
Leaving the switch off completely disconnects the house battery from the trailer’s electrical system. This prevents battery drain but also means no power to appliances or lights.
Can I use a battery switch with solar panels?
Yes, but proper wiring is crucial. The solar charge controller should be wired to charge the battery regardless of the switch position. Consult a wiring diagram specific to your solar panel setup.
My battery switch is hot to the touch. What should I do?
This indicates a problem. Turn off the switch immediately. Check for loose connections, corrosion, and signs of excessive current draw. Consult a qualified electrician if you’re unsure.
How often should I clean my battery switch?
At least once a year, or more frequently if exposed to harsh elements. Clean terminals with a wire brush and baking soda solution.
